There is much debate regarding wether plants require a period of "darkness" to grow. Though I will save that discussion for another day, it is no debate that plants need light. Traditional agriculture works best during the summer months when the days are long the sun is out. However, indoor agriculture gives the grower the ability to determine how much light the plants receive.
Traditionally, T8 bulbs have been used to provide light to indoor plants. However, over past several years LED lighting has become an increasingly popular among indoor growers. This is because of the cheaper cost and enhanced photosynthesis that results from their use. My own research has proven LED lights to be cheaper than traditional lighting methods. Also, most LED growing lights contain red and blue bulbs. This funky-looking color scheme, which appears purple or pink to the naked eye, is no accident. Red and blue visible light exists at wavelengths of about 440 and 640 Nanometers respectively. When plants are exposed to light at these wavelengths, photosynthesis peaks and plants can reach their healthiest state.
Based on the information above, I decided to purchase LED strip lights for my aquaponics system. I purchased two, 16 foot strips for $32, plus adapter cables to hook up the lights.Quite honestly, I doubted the ability of these lights to perform at their fullest. However, after three days of use, I am very pleased. The lettuces are no longer limp, and appear to have very sturdy structures. Pictured are the lettuce plants I started a few weeks ago. I did not transfer the plants into the cups as early as I would have liked, but I still think they will grow just fine. I currently do not have water running through the system, but hope to in a few days. Pictured below are the lettuces after three days of the lighting.
After the original "batch" of seeds I started failed to grow, I replanted new seeds. After Two weeks, Those failed to grow like I have seen other lettuces grow. Immediately upon seeing this, I installed a small grow light: I suspected they were not getting enough light.
Fortunately, the plants seem to be in better shape now. As well as changing lighting, I will begin to "feed" the plants a very low dose of nutrient solution. Since lettuce does not require much nutrition (relative to other plants), I will only use a low-dose. However, prior to that, I will transfer the plants into netted-cups with hydroton. Once the root structure begins to develop, I will put the cups into the PVC pipes.
About a week ago I planted some red lettuce seeds and have seen great progress so far. I planted the seeds in small, rock wool grow-cubes. They are specially designed to maximize the growth of seedlings. This is because of the tiny air pockets and sponge-like qualities of the cubes. Here are some photos of the process.
These are the grow cubes sitting in the propagation tray where they will remain until transplant. Prior to adding the seeds, I soaked the cubes in Ph6 water to optimize the acidity of the growing environment. I made sure to soak the cubes for extra long because I was going out of town for a week after planting these seeds.
Pictured above are is a slice of lime and a pH test kit. I used the lime to bring down the acidity of the solution that the cubes sat in. As you can see by the picture on the right, the pH was about 6. The test kit works by filling the tube about halfway with the solution you are testing and adding two to three drops of the testing liquid. The more acidic the solution, the more red it appears after adding the testing liquid. If the solution is highly basic, it will have a blue appearance.
Pictured above are two seeds in a grow cube. I typically plant to or three in each because not all will turn out right. When I transplant the cubes into netted cups with hydration, I will remove the "weakest"/ less desirable plant.
This is a picture of the cubs 6 days after plating. The plants appear to be "stretching", which means they are not getting enough light. Since I am unable to get artificial light into this location and lettuce needs relatively little light, I am not too worried. The maroon-ish base the cubes are sitting on allows the roots to grow through the "net"on the bottom. This prevents the roots from growing flat against the cube.
Two days ago I had the opportunity to fix the problems with the Aquaponics system I am currently building. There was one main problem: the water was entering the grow pipes faster than it could drain.
The solution: I attached a ball valve to the pipe at the point where the water enters. This way, I can truly control the water flow. In terms of the valve, what I expected to happen turned out true. As I made the hole the water pass through smaller, the water would shoot out faster. This remained true until a certain threshold, where the water began to trickle into the pipe.
Water passing through the valve
In the video above, you can see the water entering the pipes as I adjust the ball valve. Towards the end of the video, you see that I reached the point where it is only a small "trickle" of water entering the pipe. That is the level at which I would like it to remain. As long as the water is not draining as a significantly faster rate than the water entering, then I am glad.
Another change I made was the height at which the water leaves the pipes. I set the drain tubes to the lowest height possible, which I think is an ideal height- just enough for most of the roots to get wet.
As well as changing the drain height, I adjusted the level of the pipes. The support structures were purposefully made so that one end of the pipe was 1 inch lower than the other. This way, the water would be continuously flowing down the pipe. The only problem I encountered was that all the water would pool together on the lower end of the pipe. This left little water for plants on the higher end.
This is a side by side comparison of the water on the high end(left), and water on the low end(right). The difference is quite obvious, one end is a small creek, while the other is like a river.
By raising the height of the lower end, I achieved a greater balance in the water level throughout the pipe.
I took these photos as water was running through the system, the second time so far. I ran the water through for two hours to make sure there were no leaks or flooding.
Another "problem," if you may, was that the water was not draining out of the bottom pipe into the fish tank very fast. I quickly realized the problem: the hose clamp used to secure the end cap was raising the pipe. As soon as I returned the pipe to its proper position, the water instantly started flowing faster.
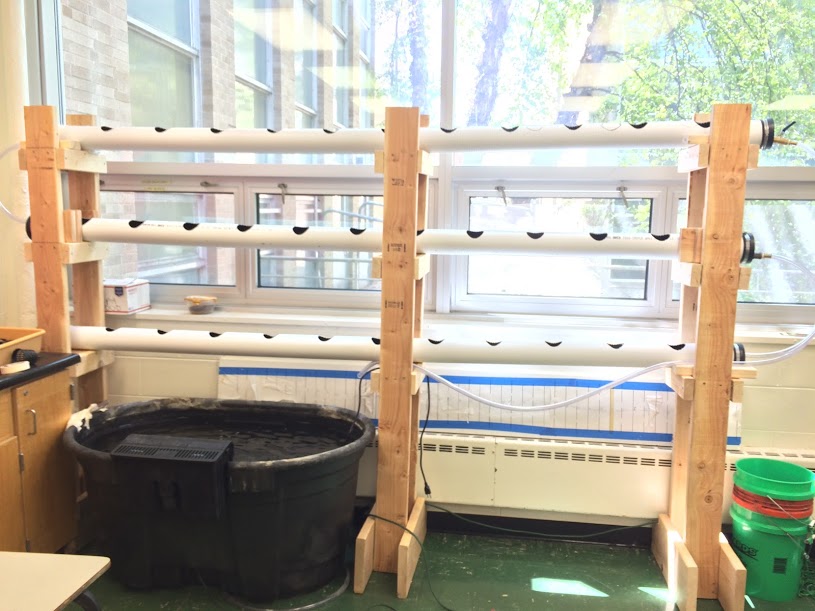
In addition to the water flowing through the system, another great advancement was made: new fish were added to the system. 45 tilapia were purchased and will take about 9 months to mature. Since these are new fish, I will have to monitor the ammonia levels and such to make sure they do not die.
To bring this post to an end, here is a photo of the fish tank. You can barely make out the fish, but that's alright.
The iPhone, Facebook, YouTube, the list goes on. All of these have many characteristics in common; they changed the world, the way we interact with others, and our lives. They were groundbreaking concepts that will always be remembered.
Verge of A Revolution
I believe that one day hydroponics and aquaponics will enter the ranks of the inventions we deem as great and unforgettable. As earth's population continues grow at exponential rates, humanity needs to face the issue of food production. Hydroponics will become an increasingly viable solution to possible food shortages, and will one day be an undeniable force in the agriculture industry. Humanity is living on the verge of food revolution, and those involved in hydroponics are part of the change.
Yesterday, I felt that I truly joined the revolution. I began to flow water through my first medium-scale aquaponics system. At first, I was a bit cynical as to wether or not it would work. The pump has a maximum pumping height of 6.5 feet and our system is right about that tall. Another problem came up that made the first problem no longer a worry. The tubing was not long enough to extend from the fish tank to the top of the system. The solution: pump water to the second level, not the third. The result: water was flowing through the system flawlessly almost flawlessly. One endcap began to leak because the two sealers on the cap were not tight enough. Other than that, I felt I had accomplished something truly amazing.
Within the next week and a half plants will be growing in the system. To make sure everything is set I need to buy a longer tubing to connect the pump to the top level of the system. Then I need to tighten the outflow region of one of the endcaps. After that, plants will be growing.
It has been quite some time since my last post. Obviously, a lot has been done since then. I am working on connecting the pipes with a plastic tube so the water can "stair step" down the pipes. Doing this properly was of particular concern because I do not want the system to overflow, be filled with too much water, or have too little water.
The plan to connect the pipes is to put PVC end caps on the ends of each tube, and run a 1 inch plastic tube through the cap. By doing so the water in the pipe will flow to the next pipe when the water reaches the height of the plastic tube. I have already drilled a 15/16th inch hole into each end cap. However, the win problem is making the tube fit snug so the water would not leak out.
Despite this roadblock, I still continued to start some seeds so that by the tim the system is running with water, there will be something to grow. I began by soaking small grow blocks in water with a dash of lemon juice. The purpose of this is to change the pH of the grow blocks, so the environment is neither to acidic nor basic when the seeds are put in the blocks. Pictured above are the grow blocks sitting on a support structure within a tray with a dome. The purpose of the support is that the roots will not grow flat, and around the blocks. If they have room to grow down, they will do so. Pictured on the left is the pH measurement of the water I used to soak the grow blocks, about 6.
Pictured above are the seeds when they first started out. I kept them in a humidity dome for obvious reason. I also kept my Sunblaze Growlight on the the entire day. Some may argue that this is not good for the plants. However, there are differing opinions on the topic as to wether they should have periods of darkness. I am one to believe that constant lighting is best.
After several days, the seeds began to germinate. I took off the humidity dome because I feared the growth of fungus, bacteria, etc. Also, as seen in the picture above. The seedlings seem to be "stretched". This "stretching" is not favorable and results from a lack of light. As you can see, I moved the light significantly closer because the strength of a light source relative to distance either increases or decreases (depending on which direction you move the light) exponentially. After 20 hours, the stems began to stop stretching.
Here are the plants after several more days of growth. As you can see, more leaves have grown and they are less "stretched". Another sign of a healthy plant but not pictured is a healthy root system. The rots are long, thick, and branching outwards, One of the benefits of growing lettuces are that the nutrient requirement are relatively low. Maybe this explains the low nutritional profile of lettuces compared to other greens such as spinach?
Once the roots grew out, I transferred the plants into small grow cups with slits on the bottom. Surrounding the plants are clay pebbles, often referred to as hydration. Hydroton is very popular because it is inexpensive, works well, and allows for aeration. The purpose of hydration is to support the stems of the plants. I transferred these lettuces as the stems began to droop sideways. This also happened to be to ideal time to do so - The second pair of leaves was beginning to grow. Pictured above is a very healthy looking plant. I still have them sitting in the tray, but without the support structure. Hopefully the system will be up and running soon so these plants can be transferred.
Today I finished drilling holes into the pipes. There process of drilling the holes was unexpectedly easy. Also, it was rather quick. To clarify, we are using 4 inch triple wall drain pipes, each ten feet long. In the end, we will have 11 plants growing in each tube for a total of 33 plants. Eventually, I hope to expand the system to have two pipes running side by side for a total of 66 plants.
Looking towards the future, there is still a lot that needs to be done until I can begin to grow something in the system. First, I will need to buy tubing to connect the pipes for the water to drain through. Then, I will need to attach the end caps to the tubing.
Just an update with a few pictures of the most recent work on the aquaponics system.
Here is one of the stands the pipes will be resting on. To completely finish them, we will have to add the support boards to the bottom, as pictured above.
After a few weeks of careful planning, I have finally managed to pool together the resources needed to build my aquaponics system. Some changes were made to the design in order to maximize the amount of space I have available. The major change will be extending the length of the tubing so the system is an entire ten feet long.
Another change being made will be the use of free standing support structures to hold up the tubing. This decision was made to be able to hold the 10 foot pipes up in a sturdy fashion. Another adjustment I made was using caps at the end of the tubing, sealed with a hose clamp. This will allow me to more easily adjust the height of the water inside the tube, which will be very important because I do not intend to flood the plants.
One note about the supports holding the tubes: These were a little tricky because we want the tubes to be slanted slightly downwards so the water moves down the system like a stepping down a stair. So on the right hand side, the highest tube will be 6 ft in the air, the middle 4.5 ft, and the lowest, 3 ft. This must be taken into account by making the support at the opposite end of the tubing hold the pipe at 5'11", the middle tube at 4'7", and the bottom tube at 2'11".
Now that I have explained some changes in the system design, here are some photos of the building process: